Tutorial: run a client project end to end
This tutorial follows one small project through the whole Kanera loop. You set up a workspace, plan the work, invite people, see it all in one place, automate a routine step, get updates in chat, hand a card to an AI agent, and review the week.
It takes about 20 minutes. Each step is short and links to the page that covers it in depth.
The example
You run Tidewater Studio, a small web agency. Your client, Fernleaf Bakery, has asked for a new website. You will use these names throughout:
Organisation: Tidewater Studio
└── Workspace: Client Delivery
    ├── Shared lists: Backlog -> Planned -> In Progress -> Blocked -> Review -> Done
    └── Board: Fernleaf Website
        └── Cards: Confirm scope and success criteria, Design the homepage, Write the menu page copy, ...
- You own the organisation and lead the project.
- Priya is a designer on your team.
- Tom is Fernleaf Bakery's owner. He should see the website board and nothing else.
The screenshots on this page come from Kanera's demo data, so their board, card, and people names differ from the example. The screens and controls are the same.
1. Before you start
You need:
- A Kanera account with organisation-admin permission. A new hosted organisation starts with a 30-day Pro trial, so every step below is available without a payment.
- An AI client that supports remote MCP servers, such as Claude, for step 8. AI agent connections, chat destinations, and guests need Pro or a Pro trial on hosted Kanera. Self-hosted Kanera has no plan check.
- A Slack, Discord, Telegram, or Zulip channel you can add a webhook or bot to, for step 7. You can skip that step if you do not have one.
By the end you will have:
- A workspace with shared lists, fields, labels, checklist templates, and automations.
- A client board with owned, dated cards and checklists.
- A teammate and an external client guest with the right access.
- A cross-board view of your work, an ordered Up next queue, and a Portfolio rollup.
- An automation, chat updates, and an AI agent that works cards with visible attribution.
- A weekly review in Work Done and a Table report.
2. Create the workspace
A workspace suits this project because Tidewater Studio will run several client projects the same way. Every board in the workspace shares the same lists, fields, labels, and automations.
- Sign in. When onboarding appears, choose Create a workspace. If you skipped onboarding earlier, select Start guided setup on Home.
- Choose the Project Delivery template and select Continue.
- Name the workspace Client Delivery and pick an icon.
- Review the lists: Backlog, Planned, In Progress, Blocked, Review, and Done. Keep them as they are.
- Review the custom fields: Project Lead, Workstream, Target Date, and Estimate. Keep them all.
- Review the labels: Deliverable, Decision, Risk, and Change Request.
- Select Finish setup.
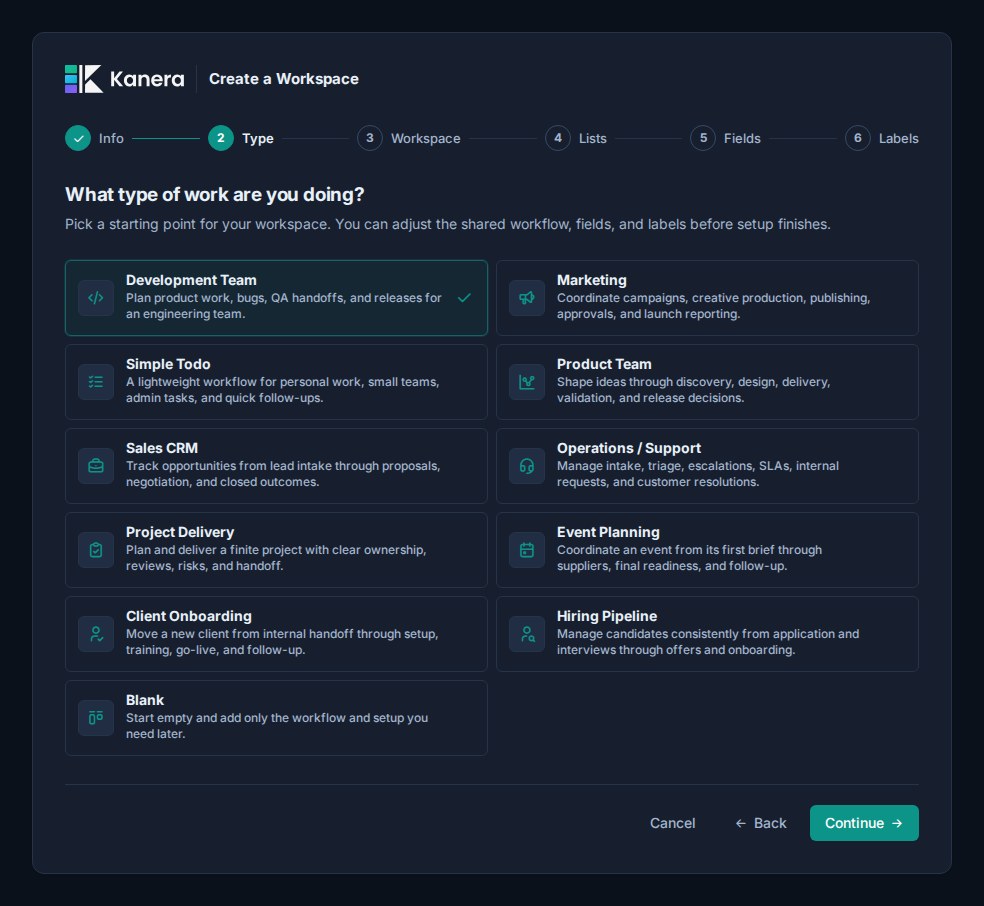
What you'll see: Kanera creates the workspace and an initial board called Delivery Plan. It includes four starter cards, the Project kickoff and Delivery review checklist templates, and three automations:
- A card entering Blocked gets the Risk label.
- A card entering Review gets the Delivery review checklist.
- A card entering Done is marked complete.
Go deeper: First-Time Setup, Workspaces.
3. Add boards and cards
Rename the board
- Open Workspace settings -> Boards.
- Click the Delivery Plan name, type Fernleaf Website, and press Enter.
The starter cards now belong to the Fernleaf project: Confirm scope and success criteria, Build the delivery plan, Review risks and dependencies, and Prepare the stakeholder review. Keep them; they are ordinary cards.
When Tidewater Studio signs its next client, add another board from the creation row on the same page. It will share this workflow automatically.
Add cards
- Open the Fernleaf Website board.
- In Planned, select Add card, type Design the homepage, and press Enter.
- Add two more cards the same way: Write the menu page copy and Set up online ordering.
Press C on a board to open the card composer from the keyboard.
Fill in a card
Open Design the homepage and add:
- Assigned To: yourself for now. You will hand it to Priya in step 4.
- Due date: the end of next week.
- Labels: Deliverable.
- Custom fields: set Workstream to Delivery and Estimate to
8. - Checklists: select Add checklist, name it Homepage, and add items such as Hero section, Opening hours block, and Mobile layout review.
Open a checklist item to give it its own assignee, due date, description, or sub-checklist. Use this when a smaller piece of the card has a separate owner.
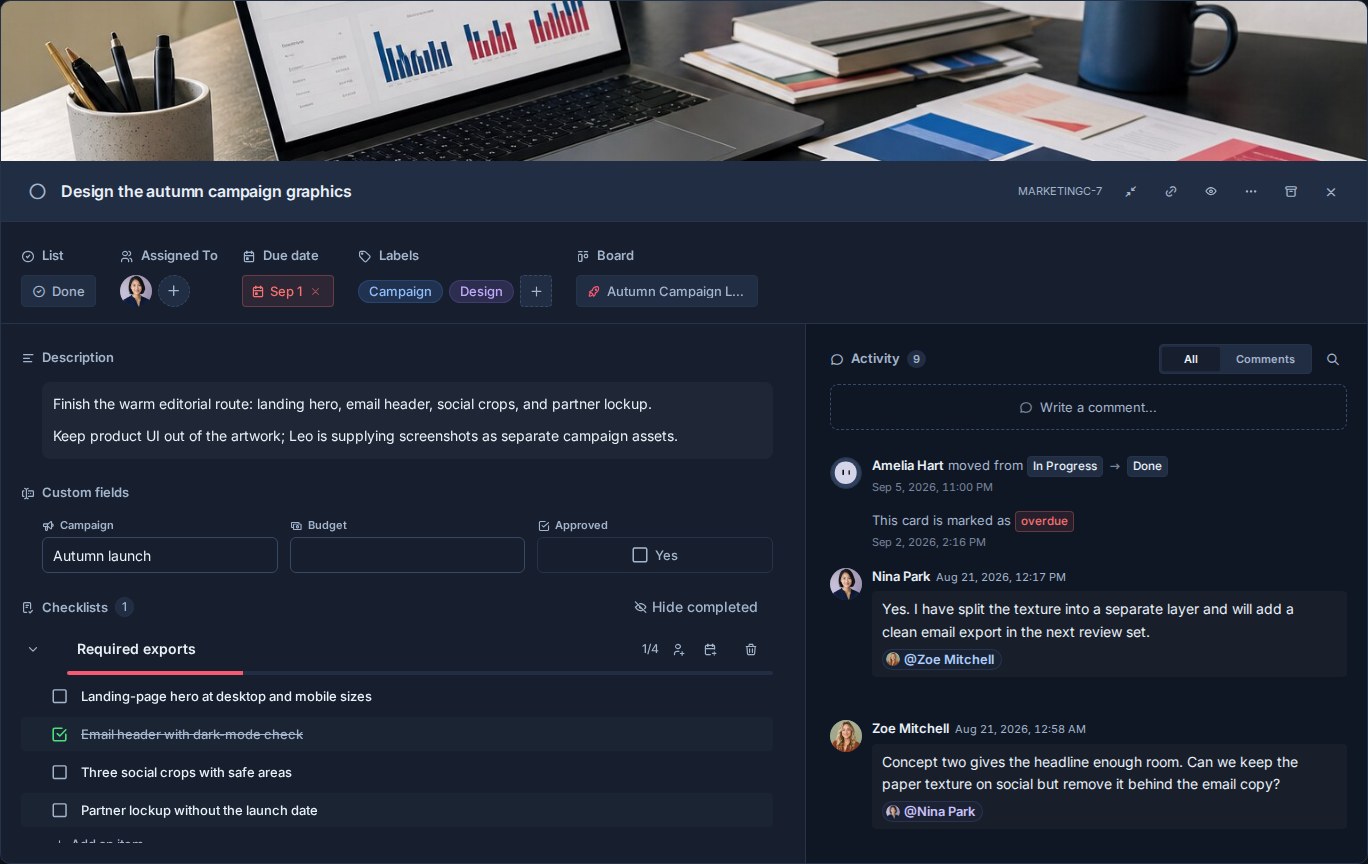
What you'll see: the card tile on the board shows its labels, due date, checklist progress, and assignee.
Go deeper: Cards, Checklists, Custom Fields, Boards.
4. Invite a teammate and a client guest
Priya is part of your team, so she joins the organisation. Tom is external, so he gets access to one board as a guest.
Invite Priya
- Open Profile settings -> Users.
- Under Invite people, keep Organisation role as Member.
- Under Workspace access, tick Client Delivery and keep Workspace role as Member.
- Select Create invite, then copy the invite link and send it to Priya.
After Priya accepts, give her board access. A workspace Member does not see any board until you do:
- Open Workspace settings -> Boards.
- Select Manage access on Fernleaf Website.
- Choose Priya, select Editor, and add her.
Now open Design the homepage and change the assignee to Priya.
Invite Tom as a guest
- Open Workspace settings -> Guests.
- Choose the Fernleaf Website board.
- Enter Tom's email address.
- Choose Observer if Tom should only follow progress. Choose Editor if he should also comment and update cards.
- Enable Assigned items only if Tom should see only the cards assigned to him, such as copy he needs to approve. Leave it off so he sees the whole board.
- Select Add guest access and share the invite link if Kanera shows one.
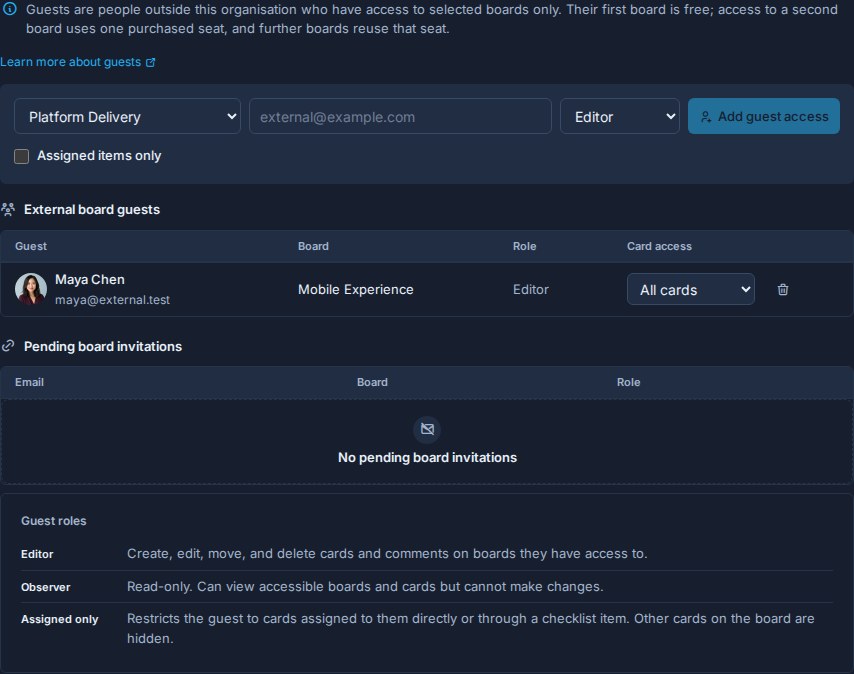
What you'll see: Tom appears under Pending board invitations until he accepts. He then moves to External board guests. He never joins your organisation or appears in the workspace member list.
Go deeper: Workspace Users, Guests, Roles and Permissions.
5. See everything in one place
Boards show one project. Once Tidewater Studio runs several, use the personal and cross-board views instead of opening each board.
Home
Select Home in the sidebar. The Overdue, Due today, Next 7 days, and Done this week tiles count your assigned cards and checklist items. Select a tile to filter Your week. Recent boards keeps Fernleaf Website one click away.
My Cards and Up next
- Select My Cards. It shows every card assigned to you across all boards you can access, plus your assigned checklist items.
- Choose Up next beside Filter to open your ranked queue.
- Add Write the menu page copy with Add card, or drag its tile into the queue.
- Add Set up online ordering, then drag the rows into the order you plan to work.
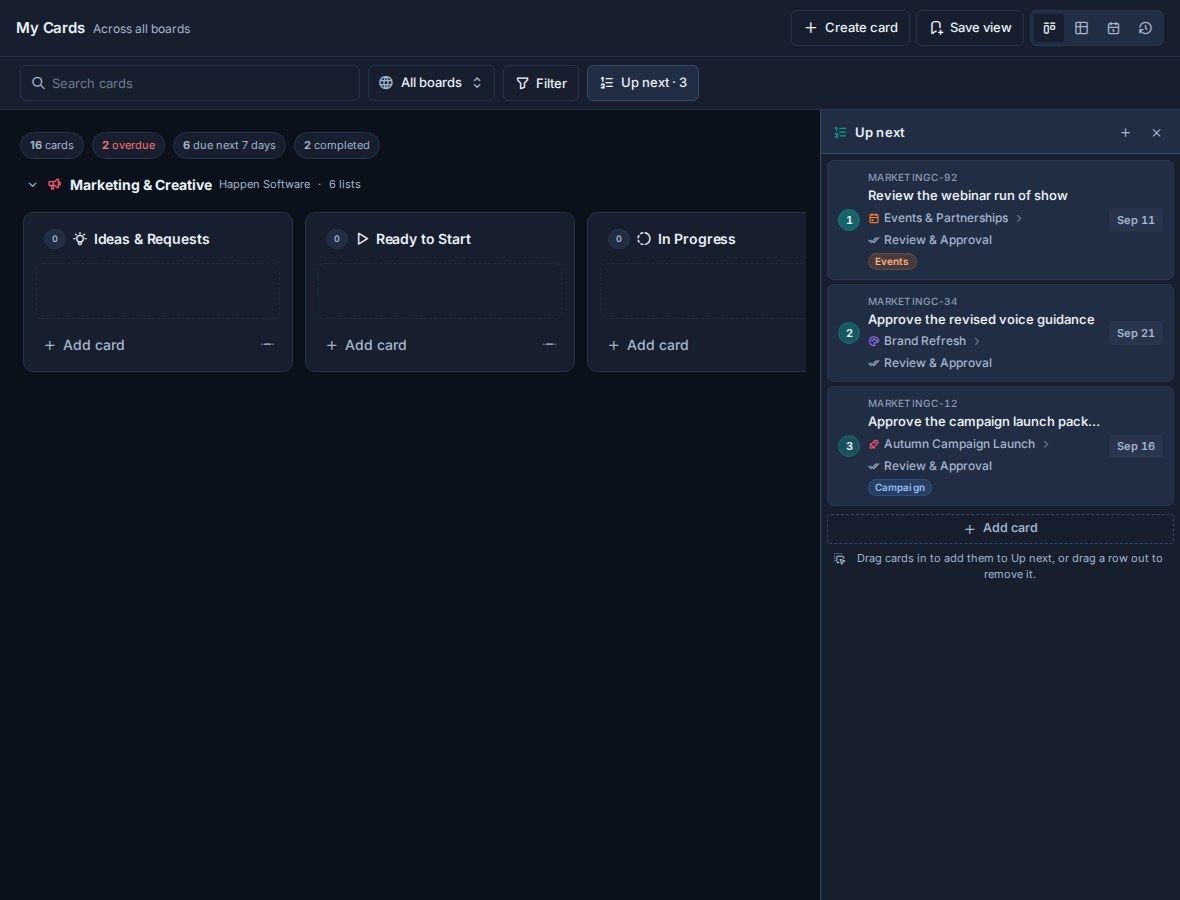
Up next is your working order, separate from due dates. Its numbered button sits beside notifications on every page.
Team Cards and Portfolio
- Select Team Cards, then choose Priya to see her cards across boards, her assigned checklist items, and her Up next queue.
- Select Portfolio for the rollup. Its Summary shows Active, Overdue, Due next 7 days, Unassigned, and Completed cards across the organisation, workspace, and board hierarchy. Select a metric to see the cards behind it.
Go deeper: Home, Global Work, Up next.
6. Add an automation
The template already handles Review and Done. Add one more rule: whenever a card reaches Review, give it a two-day turnaround and leave a note for the reviewer.
- Open Workspace settings -> Automations.
- Select New automation and expand it.
- Under When, choose Card enters a list, then choose Review. Keep Moved here selected.
- Under Do, choose Set due date. Set Due to In 2 days and Time of day to End of workday.
- Select Add action, choose Post a comment, and write something like
Ready for review. Please check the acceptance criteria before approving. - Make sure the automation is switched On.
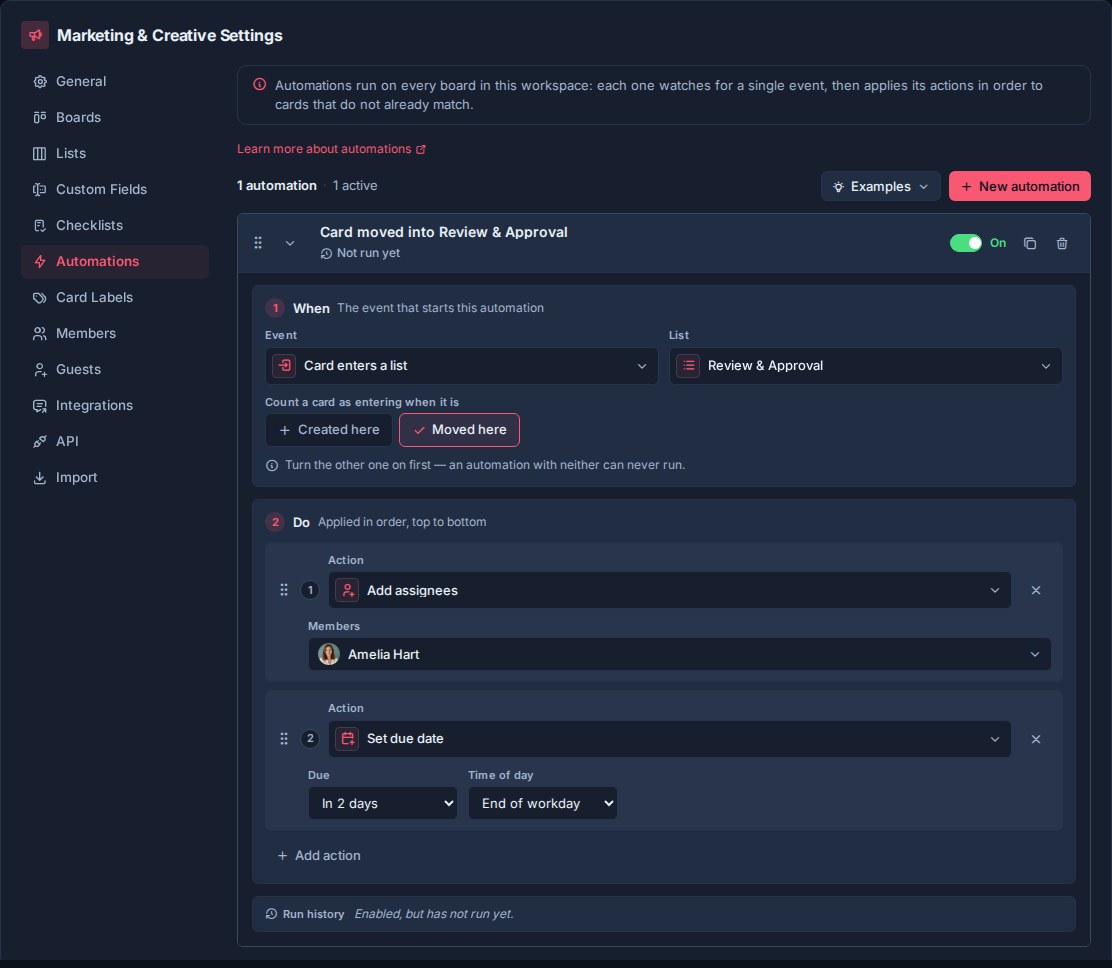
Try it: drag Build the delivery plan into Review.
What you'll see: the card receives a due date two days out, the Delivery review checklist, and the comment. The automation's Run history records the run.
Choose Examples beside New automation for more ready-made rules.
Go deeper: Automations, Checklist Templates.
7. Get notified and post to chat
Personal notifications
Kanera notifies people about work they own or follow. When you assigned Design the homepage to Priya, she received an assignment notification. Mention someone with @ in a comment and they are notified too.
Open the bell to see the notification drawer. Open Profile settings -> Notifications to choose which notification types reach you by email, browser push, or a personal channel such as ntfy.
To follow a card you are not assigned to, watch it from the card header.
Post to your team channel
Chat destinations post workspace card activity to Slack, Discord, Telegram, or Zulip. This example uses Slack.
- In Slack, create an app with Incoming Webhooks enabled, add a webhook for your
#fernleaf-websitechannel, and copy its URL. - In Kanera, open Workspace settings -> Integrations and choose Slack.
- Name the destination
#fernleaf-websiteand paste the webhook URL. - Under Post when, keep Card created, Status changed, and Comment created. Clear the others to keep the channel useful.
- Select Add destination, then use the send icon to post a test message.
What you'll see: moving a Fernleaf card between lists now posts a message naming the list it left and the list it entered, with the card title linked back to Kanera.
Chat destinations post for the whole workspace, not per person. Anyone in the channel sees the card titles.
Go deeper: Notifications, Chat Destinations, Watchers.
8. Connect an AI agent
Now hand a card to an AI agent. This example uses Claude. The same flow works with any client that supports remote MCP with OAuth.
Connect Claude
-
In Claude, open Customize -> Connectors, search for Kanera, and select Connect. If the connector is not listed, add a custom connector with this address:
https://mcp.kanera.app/mcp -
Claude opens a Kanera tab. Sign in if needed, review the consent screen, and choose Allow access.
-
In Kanera, open Profile settings -> API keys. Claude now appears in the AI agent connection section.
You never create or paste an API key. The agent acts for you, within your role on each board, and can never perform workspace or organisation administration.
For Claude Code, Codex, Cursor, and other coding agents, paste this prompt instead:
Fetch https://www.kanera.app/agent-setup/prompt.md and follow it.
Ask the agent to work a card
Assign Write the menu page copy to yourself, then enable Kanera for a Claude conversation and ask:
In Kanera, find "Write the menu page copy" on the Fernleaf Website board.
Start a run on it, move it to In Progress, and draft the menu page copy
as a comment. Then move it to Done and end the run with a short summary.
What you'll see while it works: the card tile on the board shows a live chip naming the agent and the job. Anyone on the team can see the card is being handled. The chip turns amber if the agent reports it is waiting on a person, and clears when the run ends.
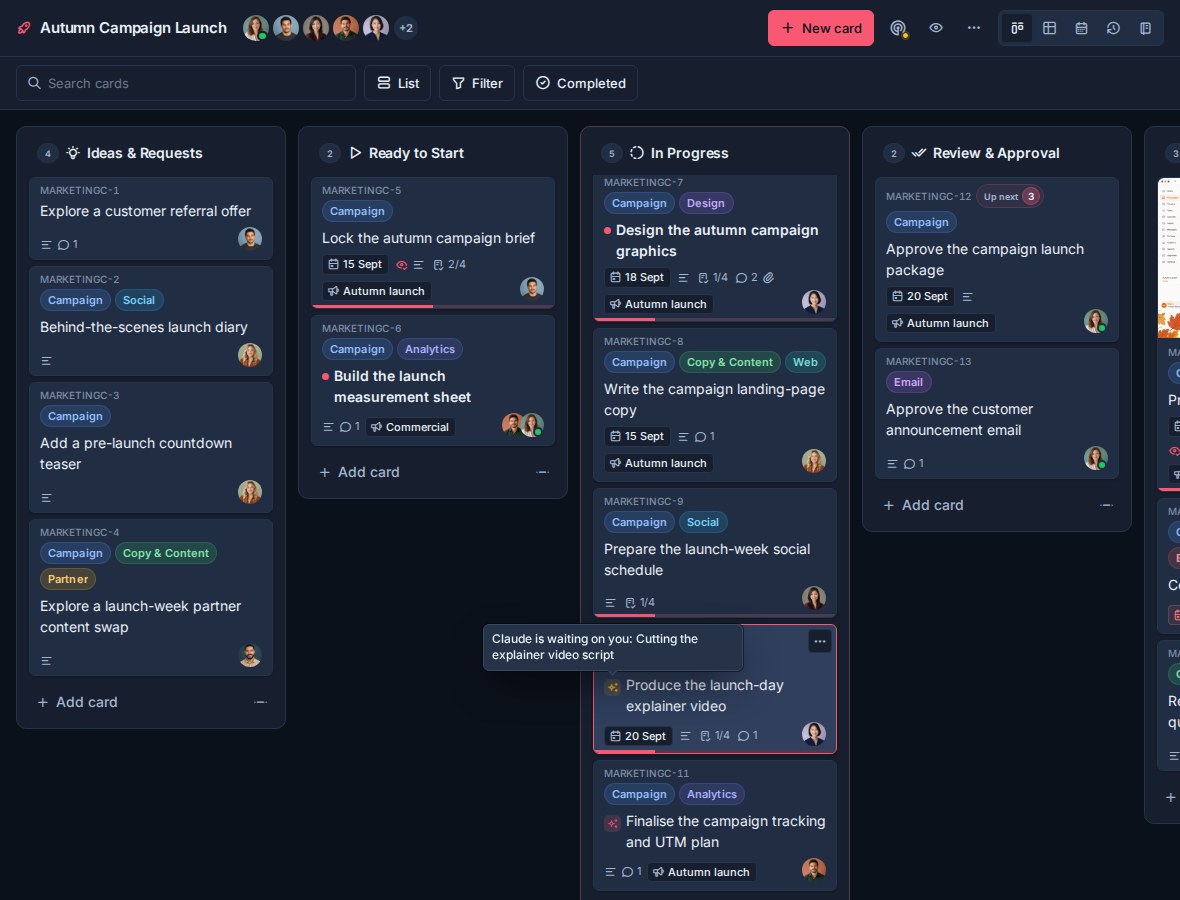
What you'll see afterwards:
- The comment and card changes in the card's activity carry a via Claude badge, so nobody mistakes them for something you typed.
- Moving the card to Done triggers the template automation, so the card is marked complete.
- The run's closing summary becomes a row in the card's activity.
- Your notification drawer gains an Agent tab. Kanera usually leaves you out of notifications about your own actions, but it notifies you about your agent's work so you can review it.
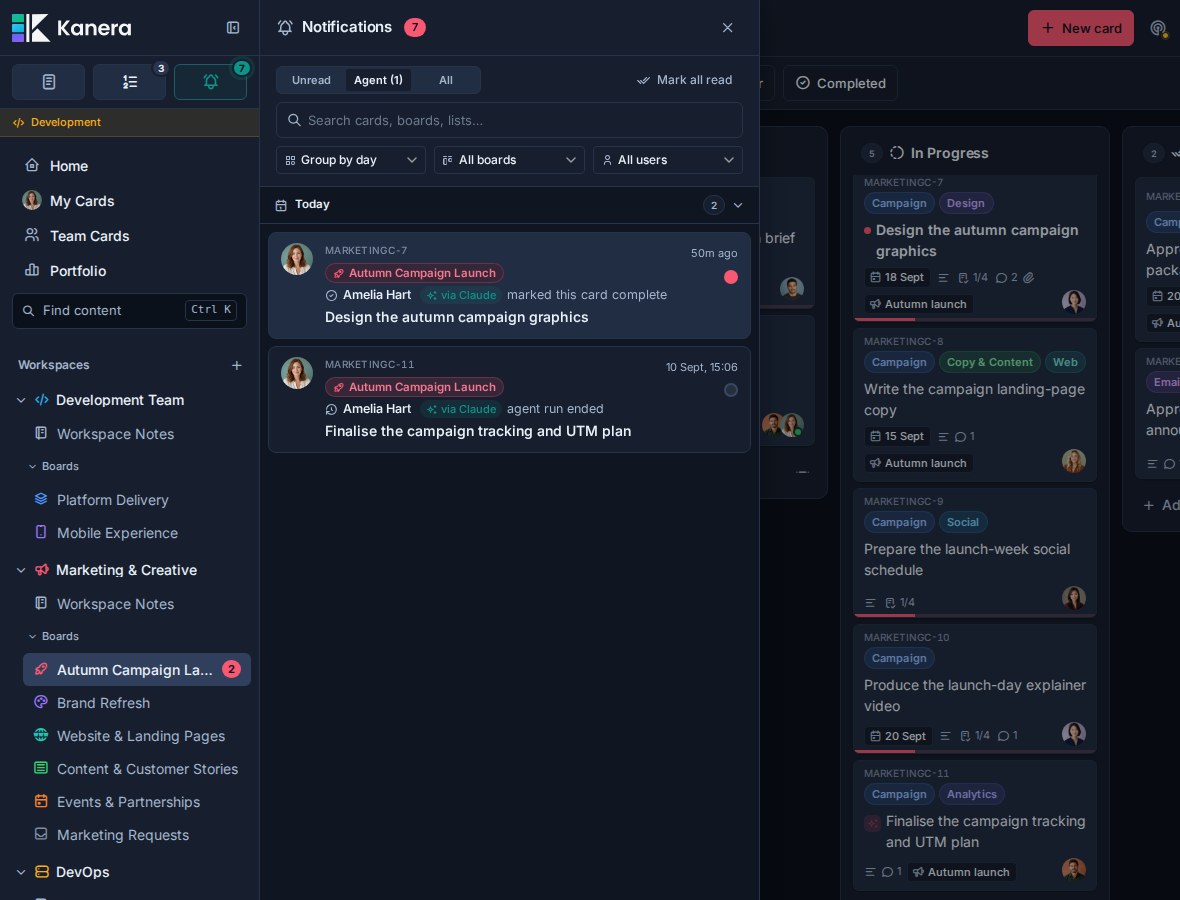
For broad or sensitive changes, ask the agent to list what it intends to change before it acts. Your AI client decides when a write needs your confirmation, and Kanera still checks your role on every board.
Go deeper: Connect an AI agent, Connect Kanera to your AI agent, Set up Claude, Agent runs.
9. Review the week
At the end of the week, check what moved and report on the effort.
Work Done
- Open the Fernleaf Website board.
- Switch to the Work Done view.
- Choose 7d to cover the week, or Today for a single day.
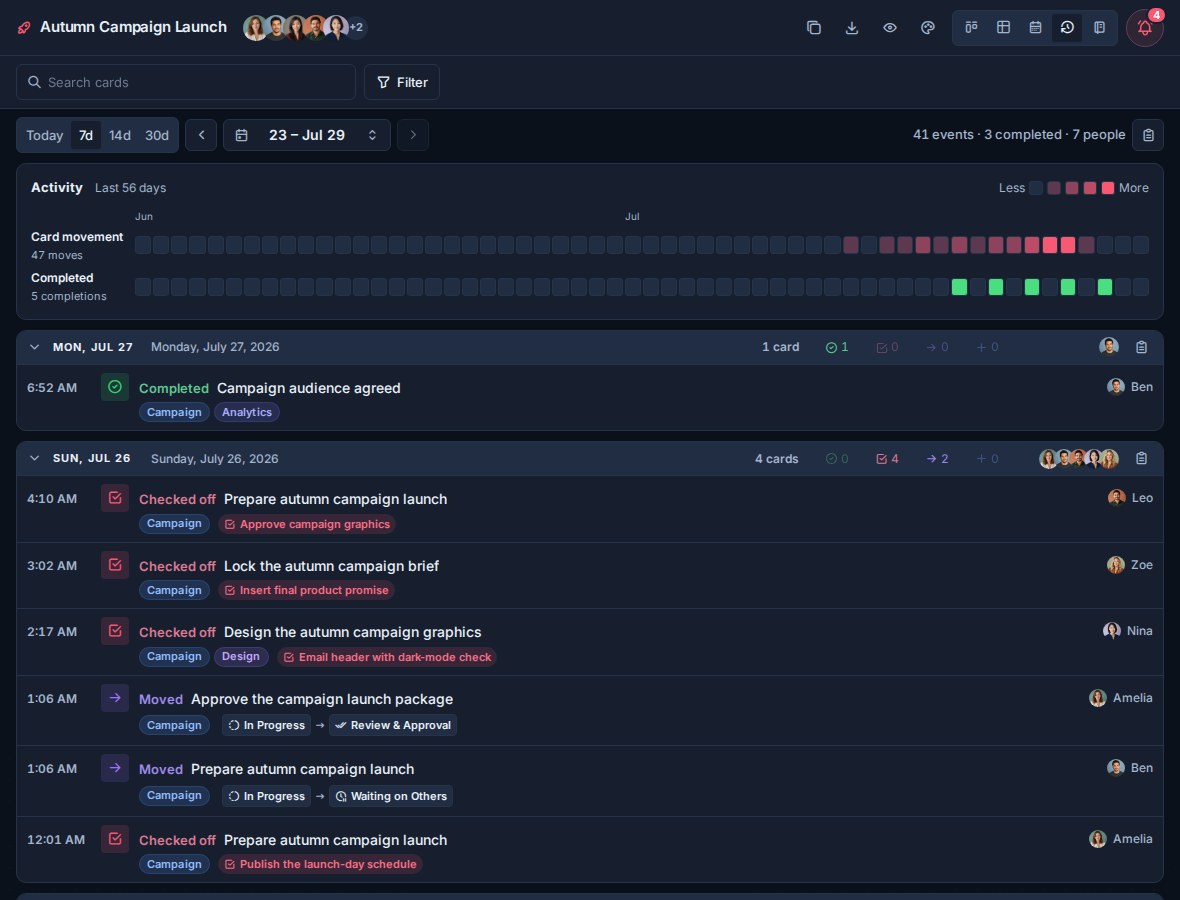
What you'll see: created, moved, and completed cards and checked-off checklist items, grouped by day, each with the person who acted. The card Claude finished shows a sparkles mark and is attributed to you via Claude, so agent output is never counted as someone's own work.
Use the same view in My Cards for your own week, or in Team Cards for Priya's.
Table report
- On the board, switch to Table.
- Group by Workstream.
- Set the Estimate column aggregate to Sum.
- Filter by label or list if you only need part of the board.
- Select Export this table and choose Excel to send Tom a status summary.
For a report you run every week, build it in My Cards or Team Cards and save the view.
Go deeper: Views, Reporting and Board Export.
10. What you've built
In about 20 minutes, Tidewater Studio now has:
- A Client Delivery workspace with a shared workflow, fields, labels, checklist templates, and automations that every future client board inherits.
- A Fernleaf Website board with owned, dated cards and checklists.
- Priya working on selected boards, and Tom seeing only his project as a guest.
- Home, My Cards, Up next, Team Cards, and Portfolio for cross-board visibility.
- An automation that sets review turnaround, and a Slack channel that follows the project.
- Claude working cards with visible runs, via Claude attribution, and its own notification tab.
- A weekly review in Work Done and an exportable Table report.
Next steps
- AI agent security: understand what a connected agent can and cannot do before you rely on it.
- Agent runs: learn how runs, progress updates, and stalled runs work.
- AI prompts and workflows: more practical things to ask an agent.
- Trello Import or CSV Import: bring existing projects into Kanera.
- Notes: keep the project brief and meeting notes beside the work.
- Webhooks: send card events to your own systems.
- Kanera TL;DR: the organisation-to-card model at a glance.